- Engineering. Made in Germany.
- SPAX - we care.
Project wooden decking: Actually quite simple, if you know how to do it. Anyone who has ever built a wooden decking, or who builds wooden deckings for others as a craftsman, will probably already know most of the technical basics and tricks for the perfect wooden decking.
Nevertheless, it is good to occasionally recall familiar things. The expert tips can also be useful as a checklist or as a proverbial knot in a handkerchief: Thought of everything, nothing overlooked or forgotten? Those who stick to it will avoid disappointment, give joy and enjoy a great wooden decking for many years – because that's what it's all about!
At a glance:
- Avoid waterlogging − Use SPAX Pads or SPAX Lift
- Never mount wood directly on wood − Use SPAX Air
- Check feasibility of the planned installation height
- Use stainless steel screws with suitable corrosion resistance
- Pre-drill planks and substructure along the entire length of the screw
- Use two screws per fastening
- Longitudinal joints of planks should always be carried out on a double substructure
- Adjust the joint width of the planks to the wood moisture at the time of installation
- Place planks inclined with corrugation in the direction of water flow
- For substructure and planks, use wood of the same durability
- Bracing the substructure and anchoring it if necessary
Live longer. Aging in beauty
With good planning to the long wooden decking life
Keep your eyes open when buying floorboards – but not only. If you want a long life for your wooden decking, you should not only look twice at the selection of wood, but also at the location, assembly and, last but not least, care and maintenance. The durability and service life of a wooden decking are, so to speak, the sum of experience and technology.
Further information about woods for the construction of your decking can be found in our wood science.
Permanence. A multi-level class society
A first indication of the resistance of natural wood against attacks by wood-destroying fungi, putrefactive bacteria and other microorganisms is provided by the 5 durability classes according to DIN EN 350. The classification indicates whether the plank is a type of wood of high or lower durability. However, the classification refers only to the core wood and not to the sapwood. The sapwood is the outer, growth-active and not yet hardened part of the trunk. The sapwood of all types of wood has the lowest degree of durability.
Constant dripping hollows the stone ... and makes wood age quickly
Logically, not only the susceptibility to biological decay has an influence on the life expectancy of the wooden decking. The service life depends essentially on where and to what extent the decking is exposed to the forces of nature. Rain, frosty cold, scorching sun and soil moisture can put the natural material wood under stress and accelerate its aging. However, most stress factors can be structurally minimized or eliminated.
Choose location intelligently
If it is possible not to build the decking on the weather side of the house or in a particularly shaded or damp area, this would also be an advantage. Your wooden deck will age in beauty and thank you with a long life!
Reduce and ventilate wet sources
Wet leaves and all kinds of soil and dirt, on the other hand, have no place on the wooden decking. Nor permanently damp flower pots and flower boxes, under which waterlogging collects. In order to avoid the infestation of mold rot, such sources of moisture should be eliminated. In the case of flower pots and boxes, suitable aids must be used to ensure sufficiently good ventilation. Parasol stands should be banned from the decking in the cold and wet season. Natural wood has something against standing moisture!
Wood protection is moisture protection
Stop waterlogging reliably – this is how it's done!
No chance of the wet traffic jam! It is best to slow down the water before it can penetrate the wood. At the same time, a regulated outflow must be ensured. Those who adhere to this basic rule when building the substructure effectively keep water and moisture at bay.
Restraining order
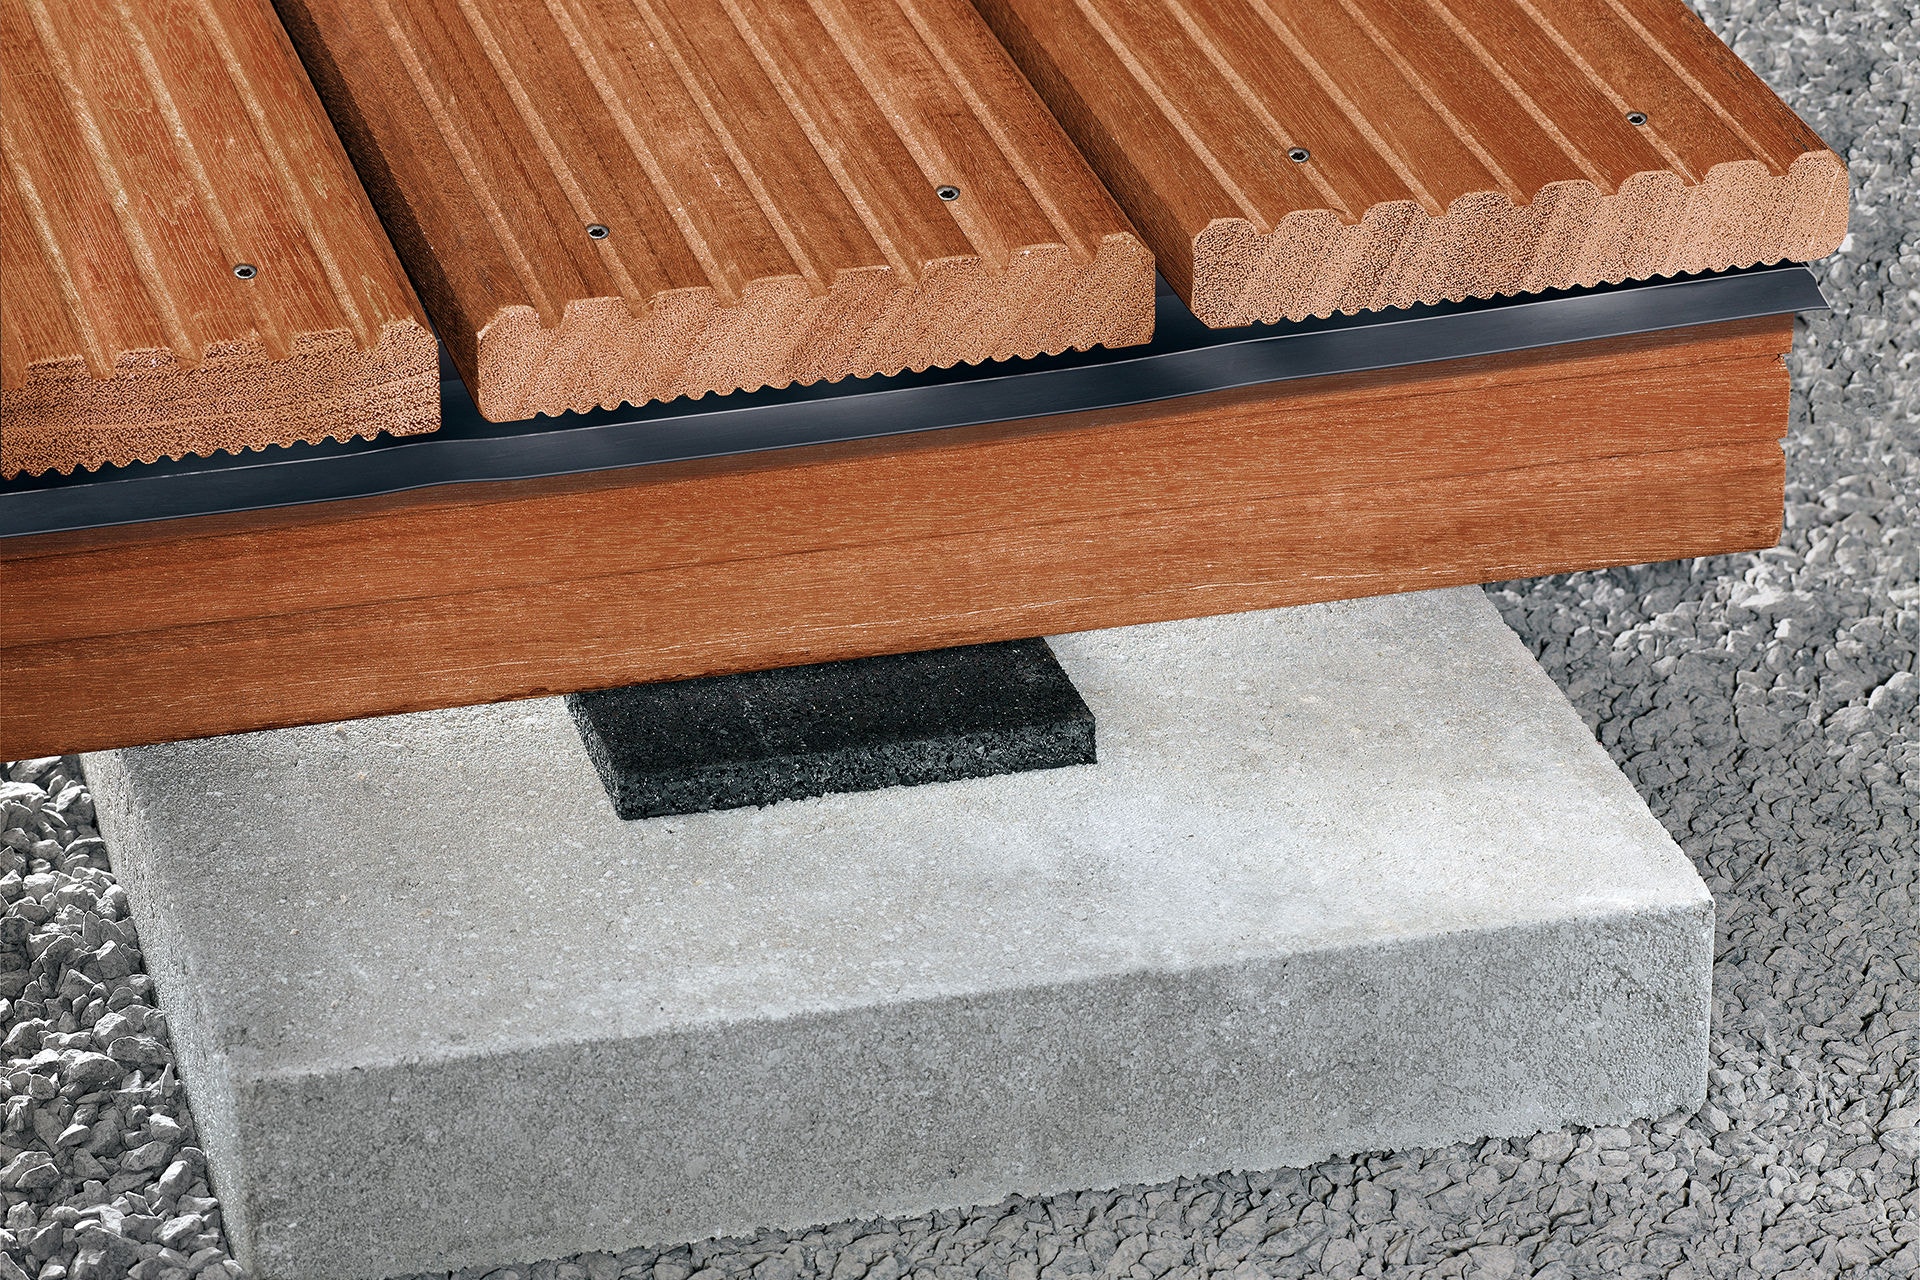
Special attention is paid to the wooden contact surfaces. To ensure that the substructure does not come into direct contact with damp soil or gravel, it is placed on concrete slabs placed at regular intervals. If you like, you can also resort to other forms of the underlay. But only if stability is not neglected! As an alternative to concrete slabs, a compacted substrate is sufficient as a basis for SPAX pads and/or SPAX lifts.
By far the best
Between the wooden substructure and the concrete slab comes a suitable base made of non-absorbent material. SPAX recommends SPAX pads made of robust recycled rubber. The rubber pads permanently protect the overlying wood from penetrating moisture. At the same time, they help to compensate for small bumps. Thanks to the pads, the water can drain optimally. The rotting of the wood is literally deprived of the soil!
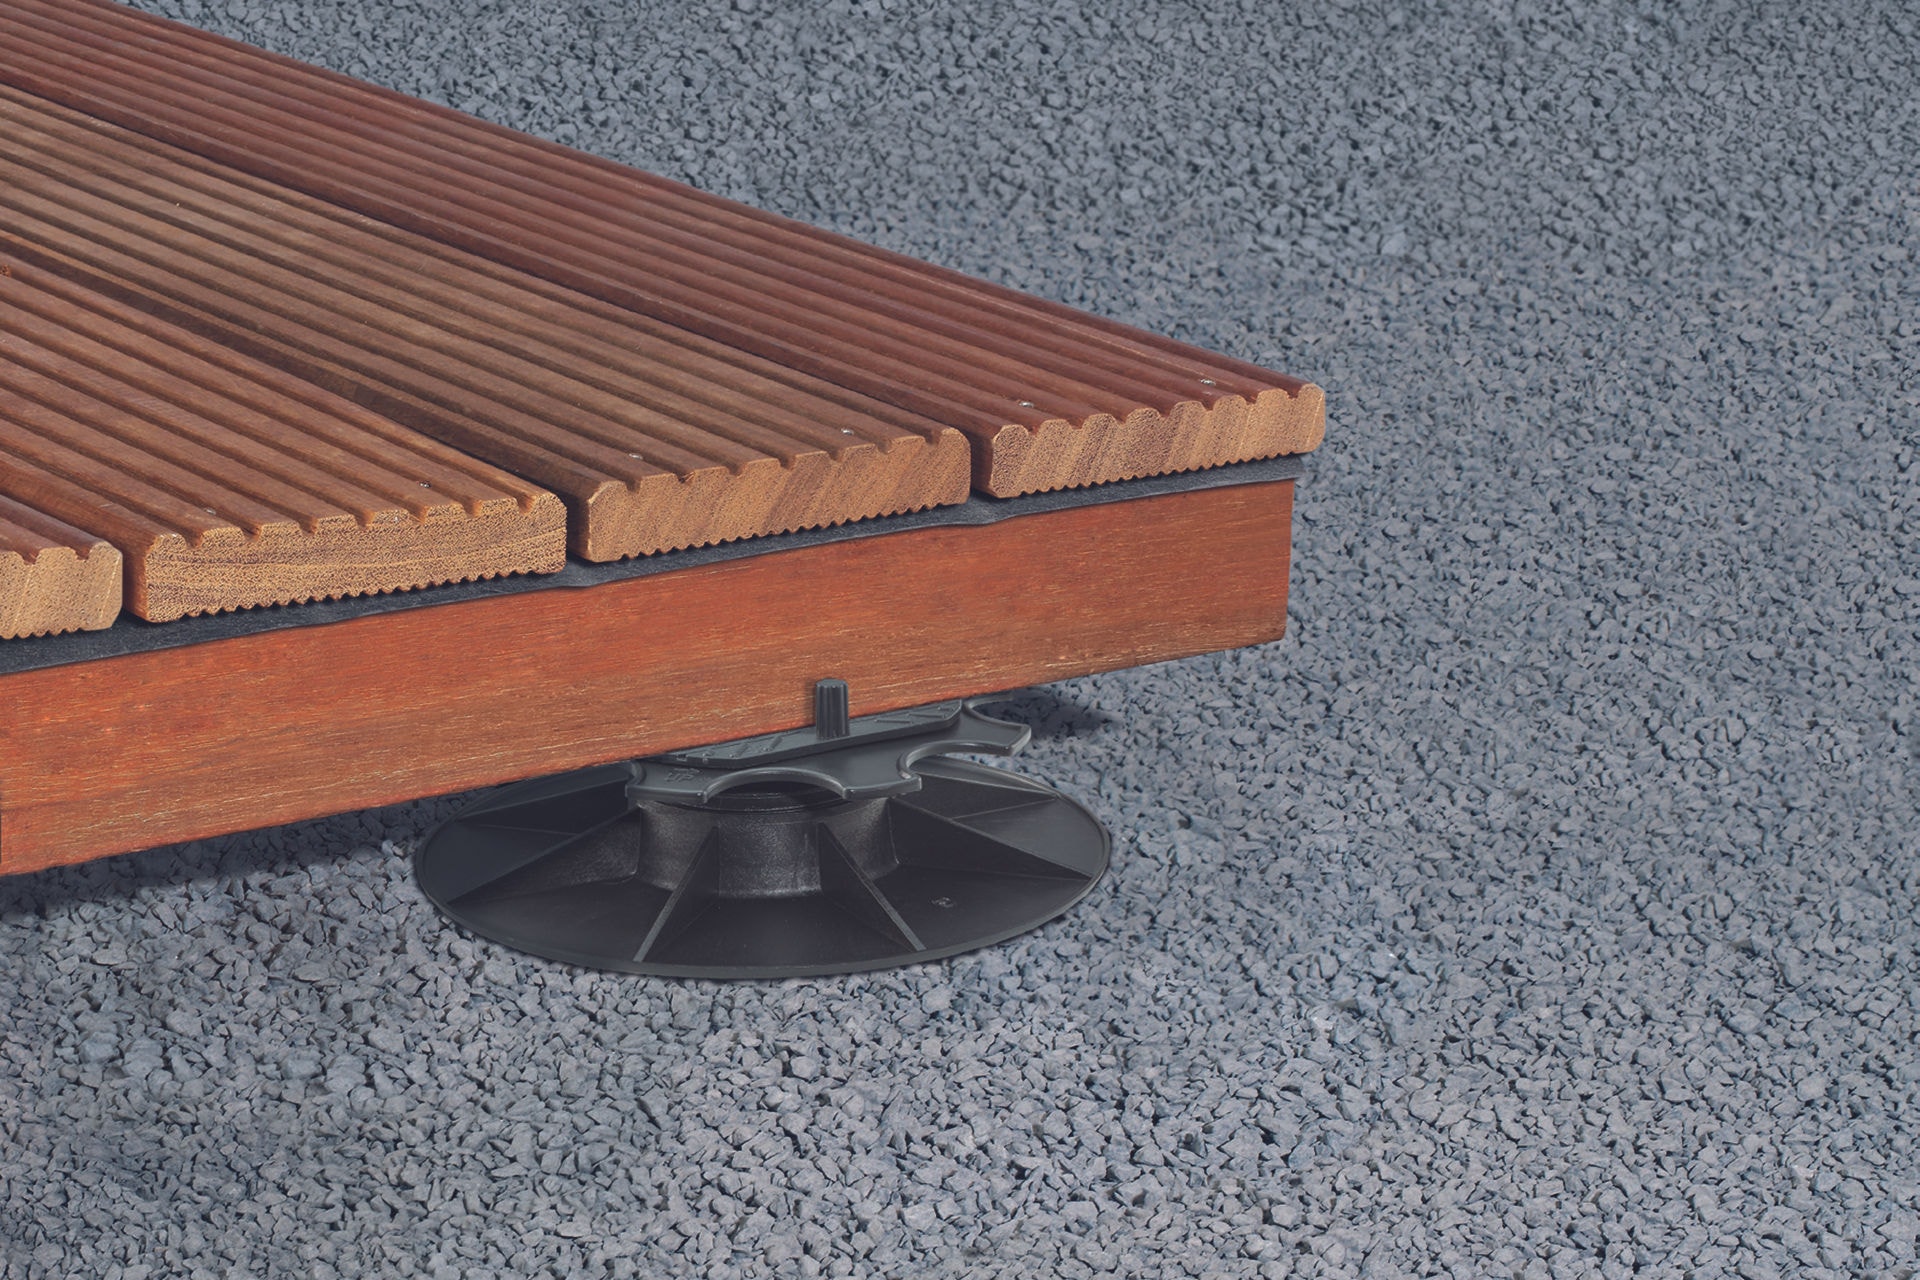
SPAX Lift adjustable feet – not only a recommendation for roof deckings
If the torsional forces caused by twisting growth are not too strong and the target height of the wooden decking allows it, SPAX Lift adjustable feet are a perfect alternative. They can also be used to compensate for differences in height to the substrate, but the compatibility of the different materials should be checked and coordinated. When calculating the number and position of SPAX lifts, special loads such as parasol stands or flower pots must be taken into account.
Live longer with SPAX Tape
Before plank assembly, the longitudinal timbers of the substructure should be sealed with a moisture barrier made of self-adhesive SPAX Tape. The adhesive tape is UV-resistant and can be easily peeled off again. For the less durable Douglas fir or larch, the protective tape is almost a must, for hard woods a recommendation. It is a simple and effective measure to prevent the substructure from becoming moistened at the points of contact with the plank and thus extend its useful life.
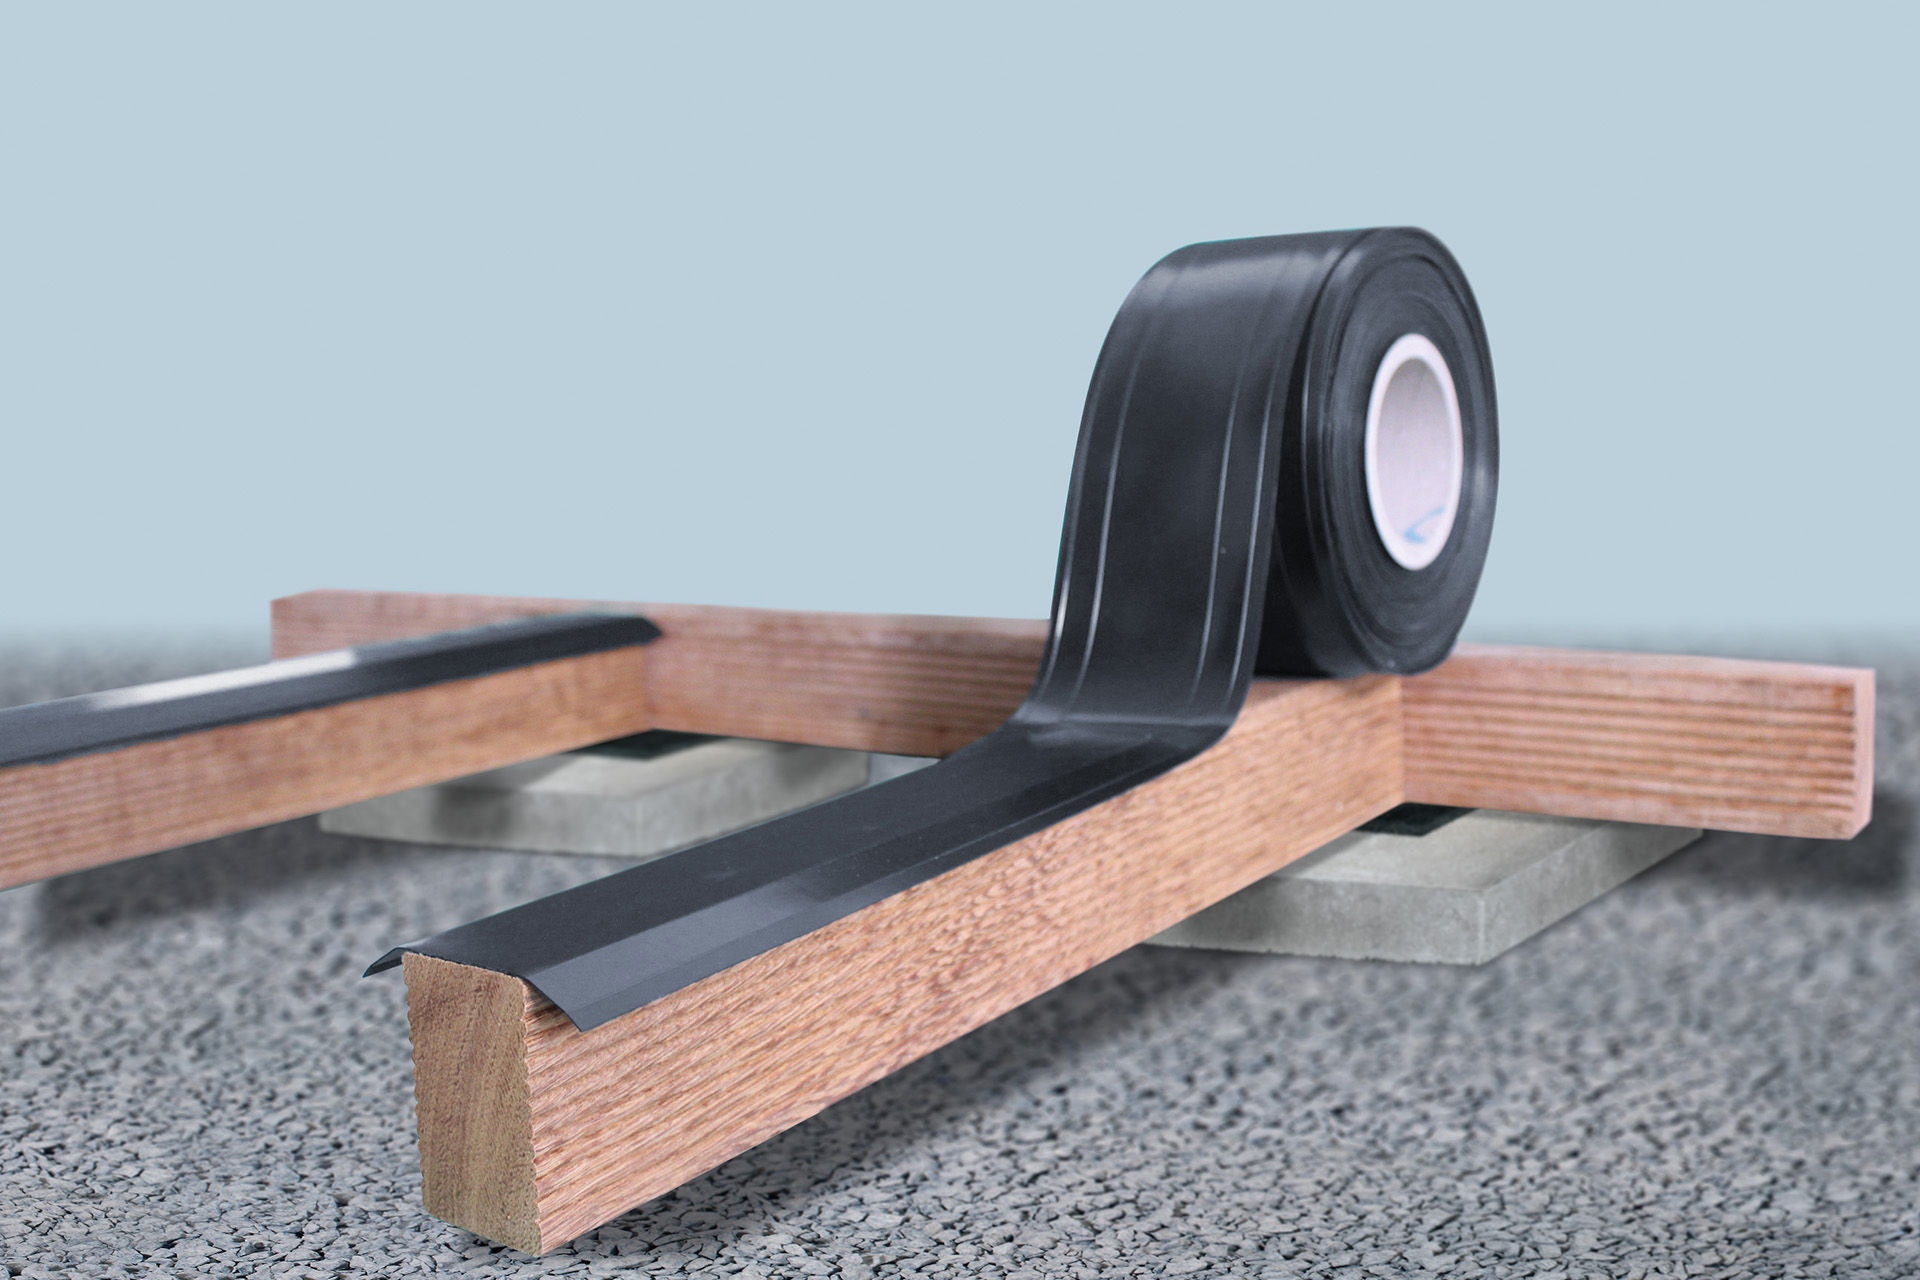
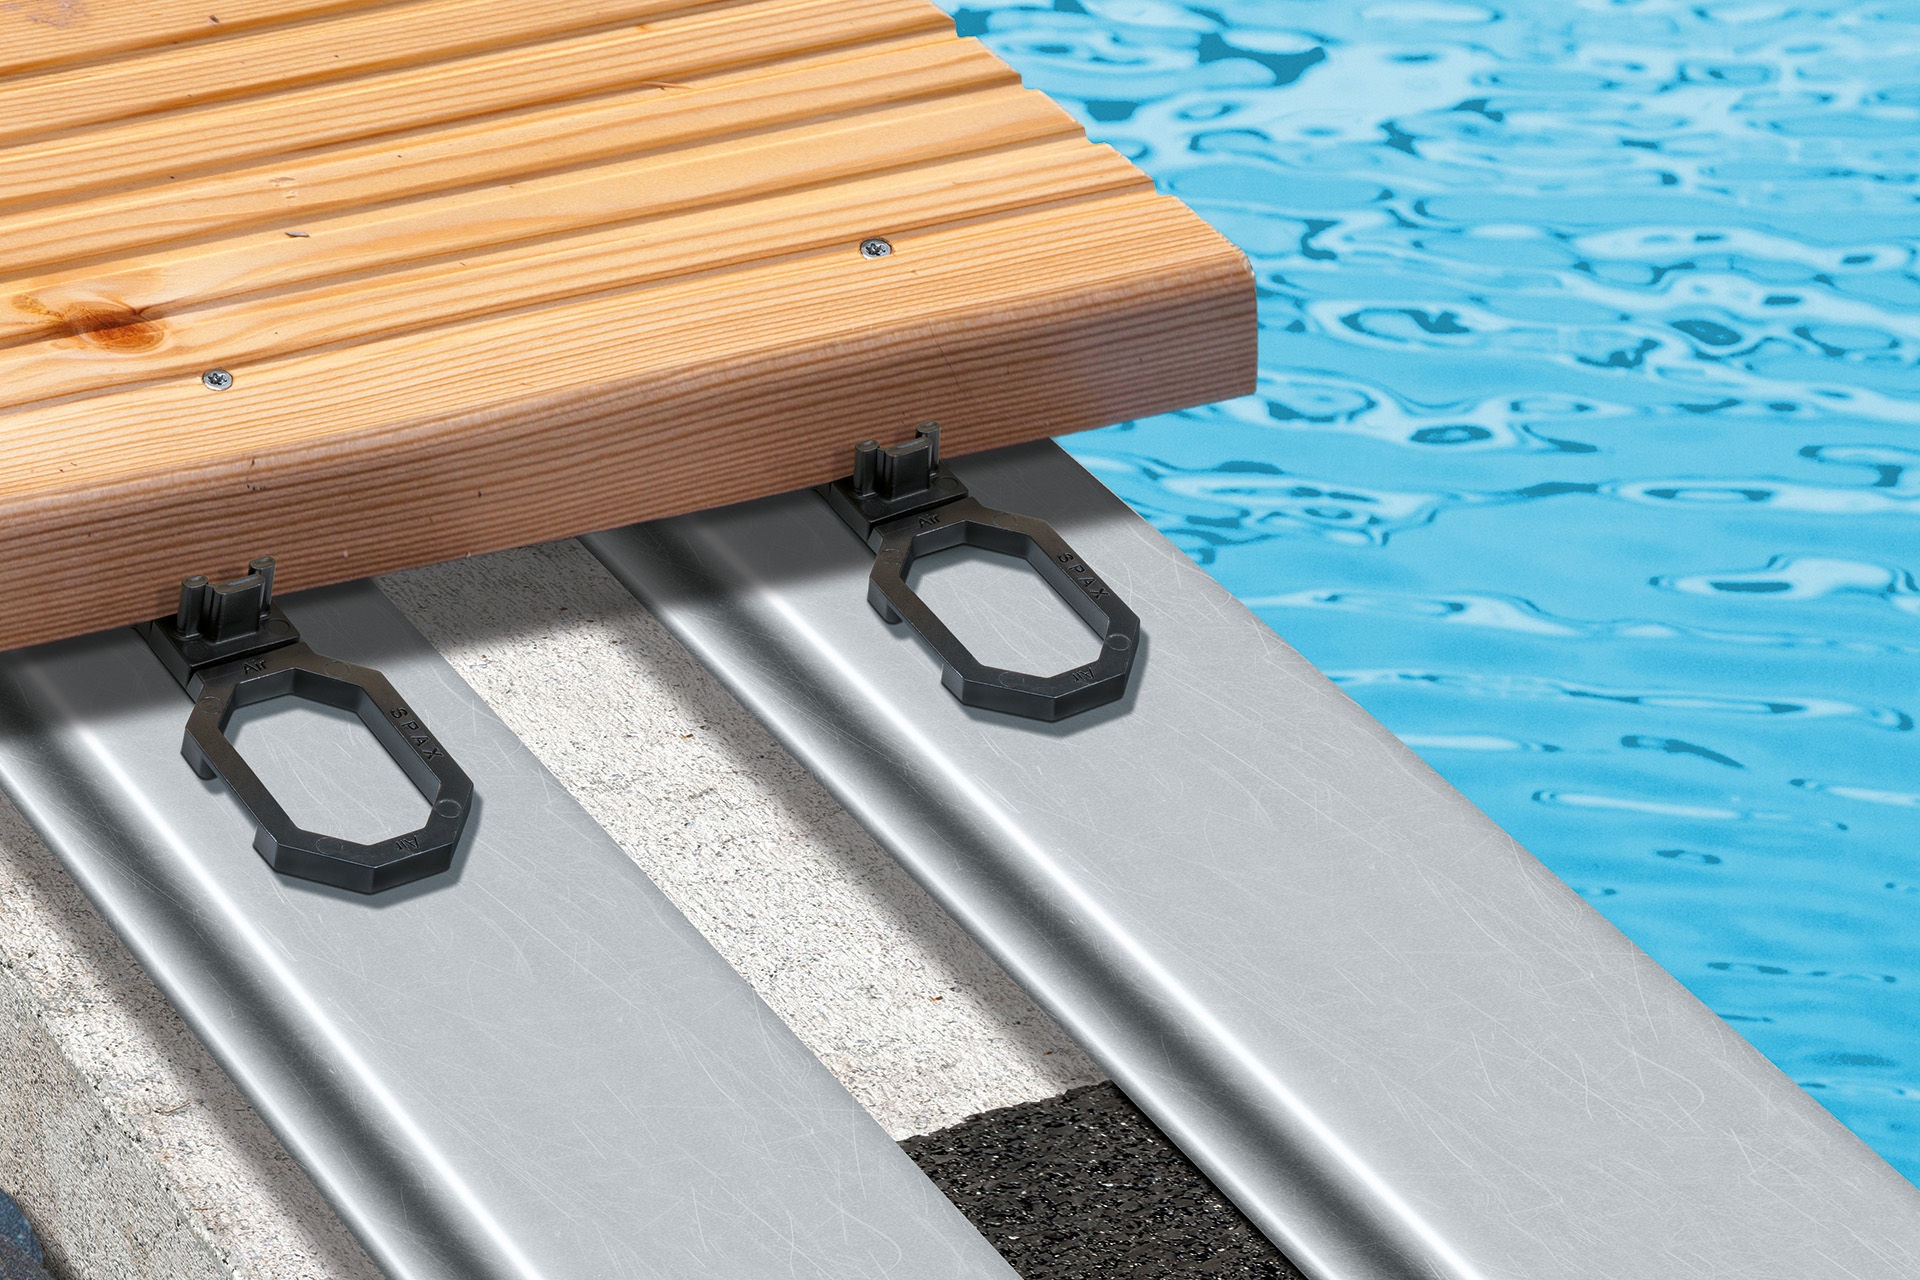
Keep your distance with SPAX Air
The SPAX Air is a ventilation bridge and, as a spacer, reduces waterlogging between the decking and the substructure.
Probably the most successful anti-aging program for wooden deckings consists in a clever and forward-looking design: In particular, heavily weathered deckings should not be installed 100% horizontally, but instead with a slight angle of inclination and plank corrugation in the direction of water flow. In addition, the insertion of spacers such as the SPAX Air is recommended. Also positive: A higher substructure relative to the flower bed and lawn!

The substructure - a solid basis
Plank and substructure: use wood of the same durability!
In the case of hardwoods such as Bangkirai or Massaranduba, the plank and the substructure should be made of the same type of wood because of their species-typical specific stretching and shrinkage behaviour. Material bottleneck? If the type of wood is not available, a similarly durable hardwood can be used as an alternative option.
Incidentally, this rule of thumb also applies to deckings with top profiles made of Douglas fir, larch or other less hard woods: The type of wood of the substructure follows the wood type of the decking, should be identical to it or at least as similar as possible!
Calculate the length of substructure and plank correctly
Depending on the distance between the two or more substructures, this results in an approx. 24 – 50 mm projection per plank end relative to the respective substructure. To avoid surprises, check the calculation twice!
To avoid tripping points, the height difference between the plank ends of the butt joint should not be more than 3 mm – so FR02 BDZ1.
No half measures when building the substructure
In order for the wooden decking to be sufficiently accessible and resilient, minimum distances must be maintained between the wooden struts of the substructure. The maximum distance for 25 mm thick decking boards is 50 cm, that for 21 mm thick planks 40 – 45 cm.
Especially with planks made of twisted woods such as Cumaru or Bongossi, failure to comply with the minimum distance can easily lead to unwanted warping and, if you are unlucky, to tripping hazards.
For NFC/WPC decking boards and modified woods, the manufacturer's specifications must be observed.
Well positioned upright
Approx. 42 x 29 mm thick squared timbers are ideal for the execution of the substructure. The installation takes place upright. Do not miss to place SPAX Pads or SPAX Lifts as moisture protection between squared timber and pavement slabs!
Exploiting hidden reserves
Structural wood protection of the substructure
Are you flirting with decking boards from a less durable wood category, e.g. Douglas fir or larch? In this case, silent durability reserves can be activated by "tuning" the substructure. Your retrofit kit for achieving the higher utility class: The SPAX Air.
Service Class Upgrade
The SPAX Air reduces waterlogging between the decking and the substructure. The structural refinement results in a significant increase in durability and thus the upgrade of service class 3.2 to the next higher service class 3.1.
Durability optimization is also an interesting way to use larch and Douglas fir for balconies or elevated structures. For these structures, the use class 3.1 according to FR02 BDZ1 is prescribed as minimum durability.
Professional down to the last joint
Proper plank assembly for a great result
Before they are laid, the decking boards should be cut off at right angles at both ends and additionally provided with a chamfer or rounding.
Remove parafin, protect headboards
The paraffin seal attached to the plank ends by many manufacturers in the country of origin as splice protection should always be removed – otherwise the paraffin can liquefy when exposed to sunlight and lead to unwanted discoloration. If necessary, they treat the head ends with a suitable end-grain wood seal or a special frontal edge wax. See also our terrace configurator.
Calculate the correct installation distance
Before drawing up the installation plan, the decking boards should be checked for their moisture content. There is no other way to ensure compliance with the joint width. For optimal installation of the decking boards, an average humidity of approx. 16% - 18% is recommended. For dryer planks, a larger joint width must be selected accordingly.
There is no wood moisture meter available? In this case, take a width measurement of 5 randomly selected planks. The average value, i.e. the sum of the measurement results divided by 5, then provides the actual measure for the installation plan.
Target joint: 5 mm
For the installation plan, proceed as follows: Determine the nominal or nominal dimension – e.g. 145 mm – from the delivery information (purchase receipt/ delivery note). With a targeted joint distance of 5 mm, this results in a total laying distance of 150 mm.
If the actual dimension and the nominal dimension deviate from each other, it is necessary to bring the deviating actual dimension to the target laying distance, in the calculation example 150 mm, by adjusting the joint width.
This means that for an average measured value of, for example, 139 mm, the joint width must be increased to 11 mm in order to achieve the laying distance of 150 mm: 139 + 11 = 150.
There's always shrinkage
Wood is a hygroscopic material. This means that it absorbs moisture from its environment and releases it again. The latter depends on a number of factors – in particular, ambient humidity. The more moisture the wood absorbs, the more it increases in volume. If the moisture content decreases, the volume also decreases again. The swelling and shrinkage of the wood takes place primarily transversely to the grain and is generally between 5% and 10% of the material width and thickness.
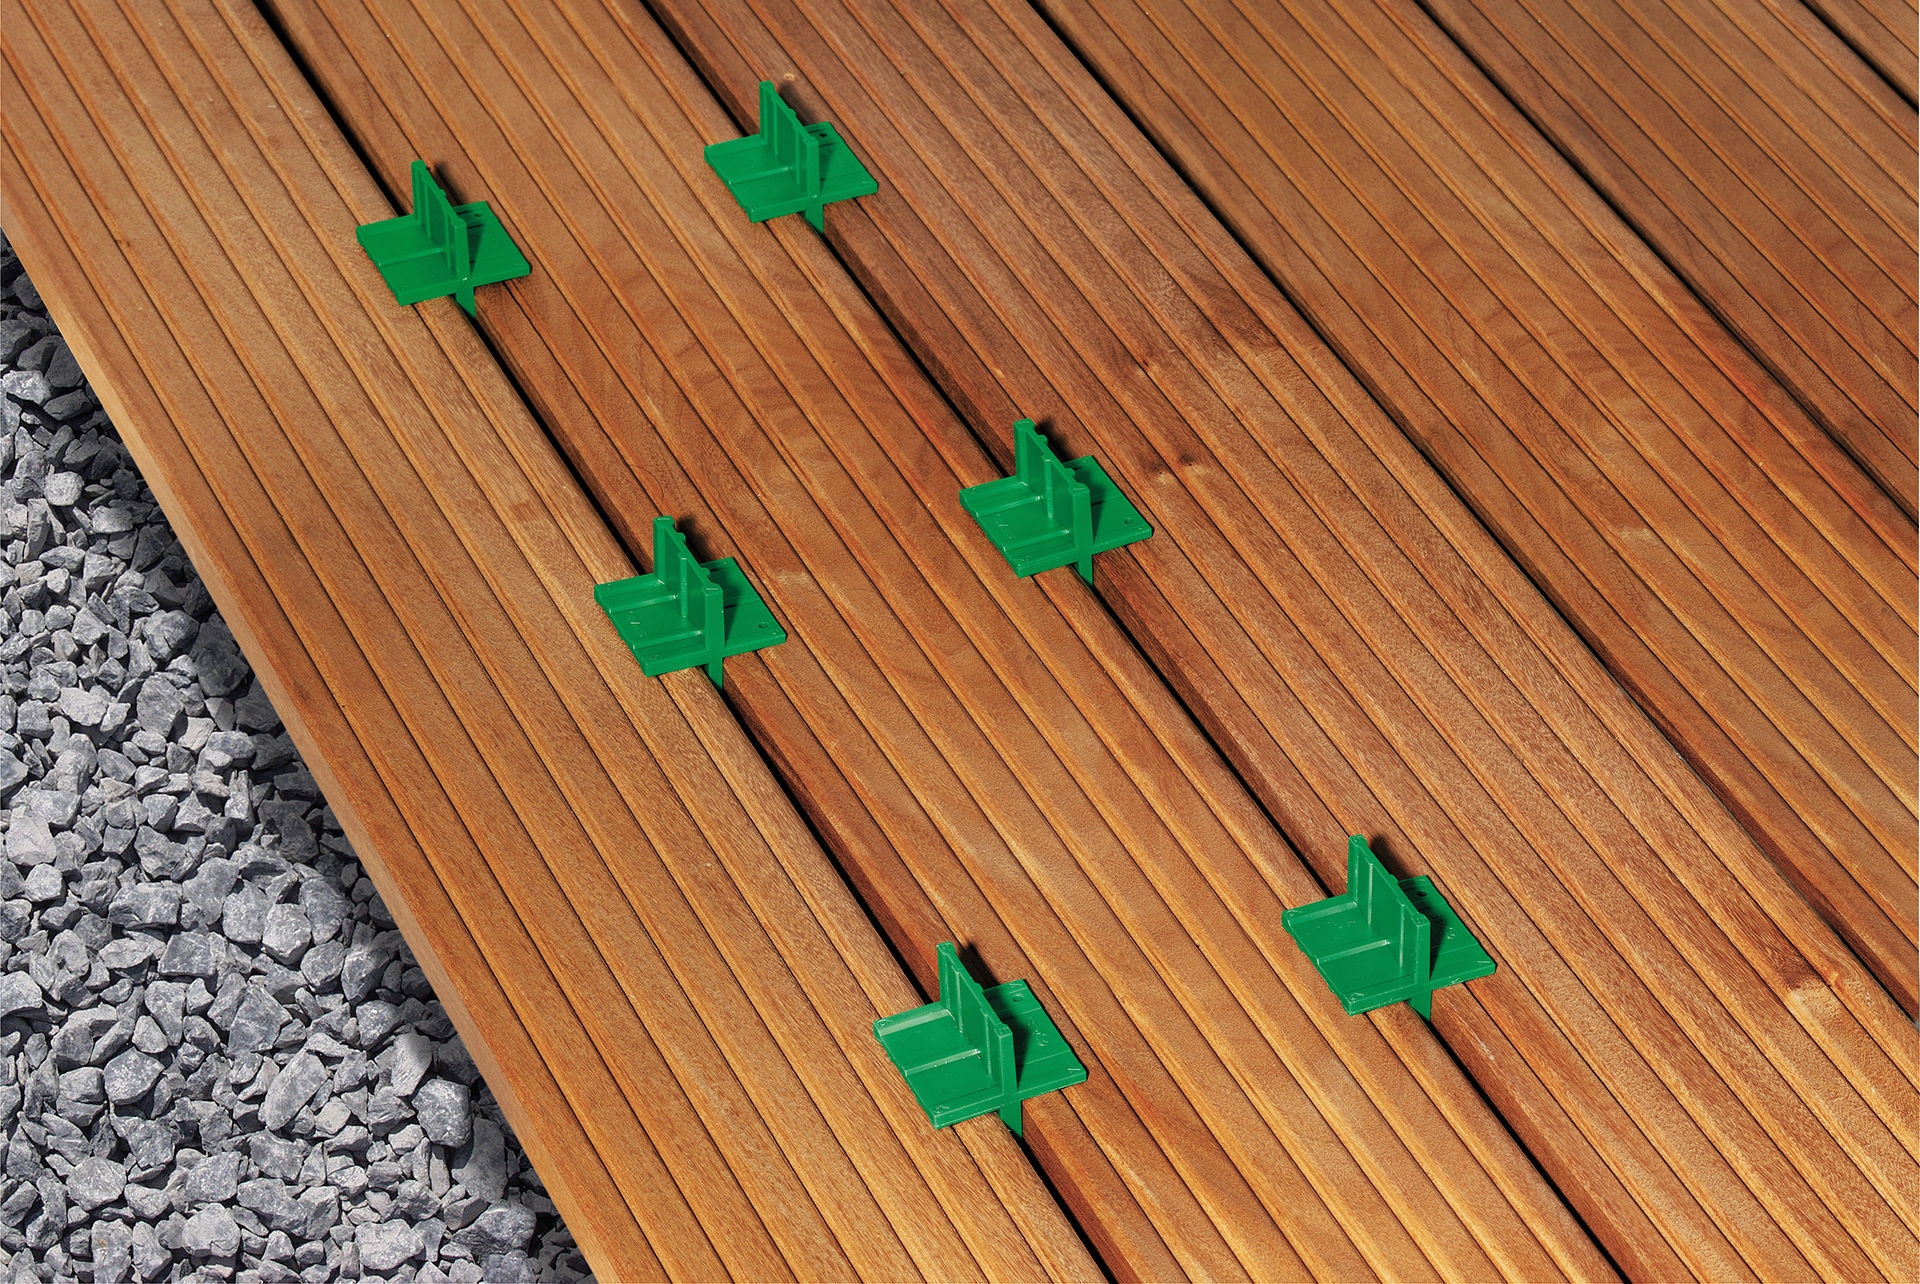
SPAX Spacer makes joint width easy
For faster work and optimum control, use the SPAX Spacer: It enables regular adjustment of the joint width and ensures a parallel course of the planks.
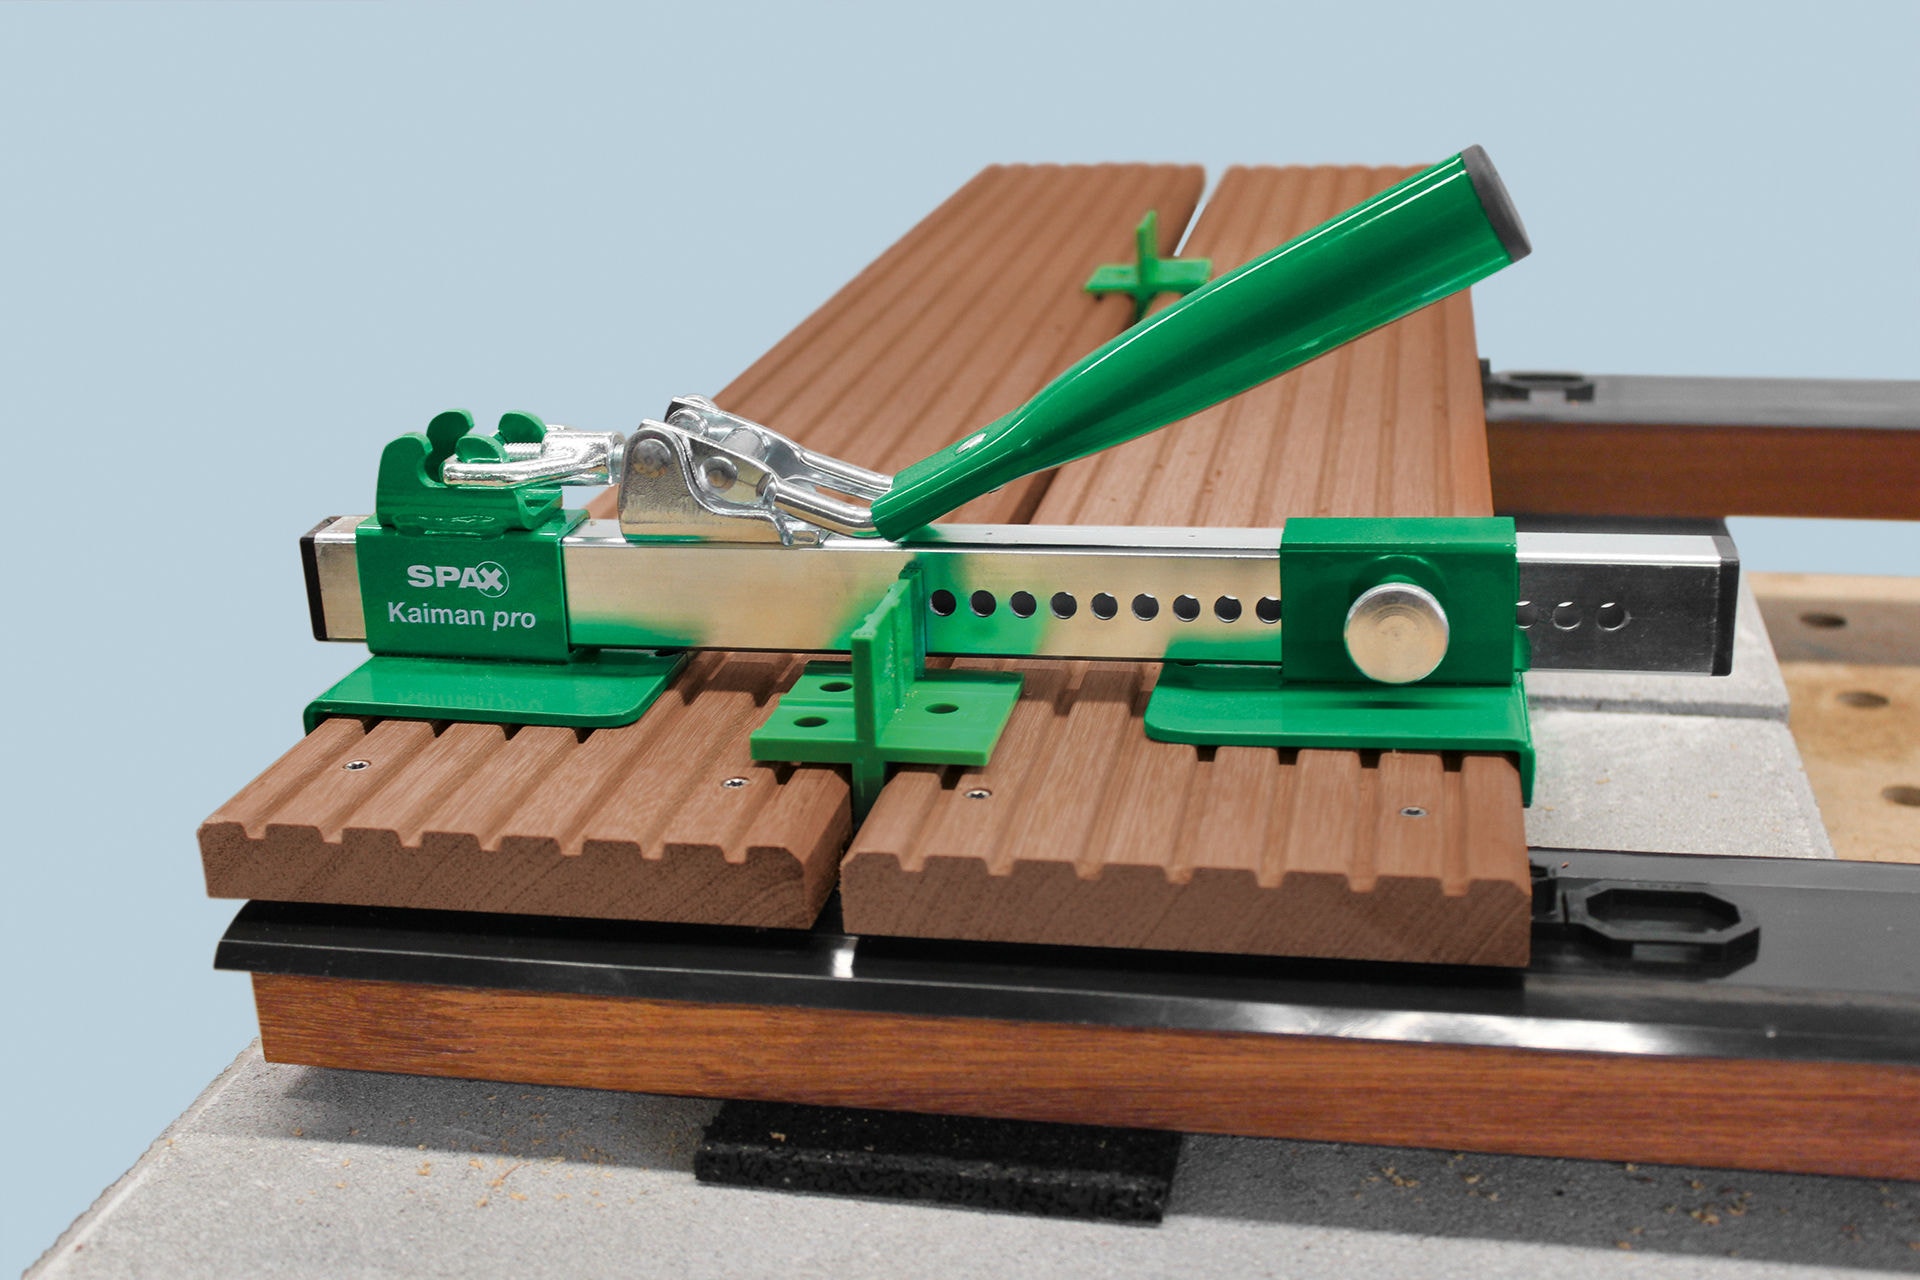
No crooked things
Curved or warped decking ruins the evenly linear joint pattern – and that is the be-all and end-all of a perfect wooden decking! Thanks to SPAX Kaiman pro, curved planks do not automatically have to be sorted out as rejects: With SPAX Kaiman pro, effective straightening and thus an even joint can be achieved for most curved woods.
Better to calculate twice than to assemble twice
If the difference between the actual and nominal dimensions of the planks at the time of installation is not taken into account and taken into account according to their value, the decking may have to be completely dismantled and relaid later. The enormous shear forces resulting from the hygroscopic volume change of the wood are not absorbed by any screw in the world! In the worst case, the resulting deformations of the screws make dismantling and reassembly difficult.
Please keep your distance
The distance to the wall of the house and other adjacent structures must be at least 10 mm. Ideal are 15 or 20 mm. For example, painting and cleaning are easier on plaster or wooden facades. At the same time, the distance ensures good ventilation under the decking surface.
Be careful with façade spacing
If the structure is a façade wall, the minimum distance increases to 300 mm. For improved façade splash water protection, an additional gravel fill measured from the building is at least 150 mm wide. Incidentally, for the carpentry trade, these guideline values are binding standards for new buildings and modernizations as Technical Rules 01 and DIN 68800-2.
Final assembly: The big screw
Screwing the decking boards on the substructure
The screwing of the decking boards is a chapter in itself. This involves the right stainless steel as well as screw-in depths, screw diameters, pre-drilling and offset. Should it be screwed visibly or fastened with concealed aids? So many questions, so many answers. No matter which type of decking and fastening you choose – SPAX has the tailor-made, technically perfect screw ready for you.
Small screw knowledge
It's all in steel – stainless steel is a must for wooden deckings. The type of wood determines which type of stainless steel is most suitable. Screwdriving science distinguishes between martensitic and austenitic steels. The special features are regulated in a special standard, DIN EN ISO 3506. Why these subtleties?
Tannin-containing woods require stainless steel A2
It is about the specific corrosion resistance to aggressive chemicals and weathering. Chemicals can also be natural tannic acid, which is found in oak, bangkirai or garapa, for example.
Visibly screwing decking
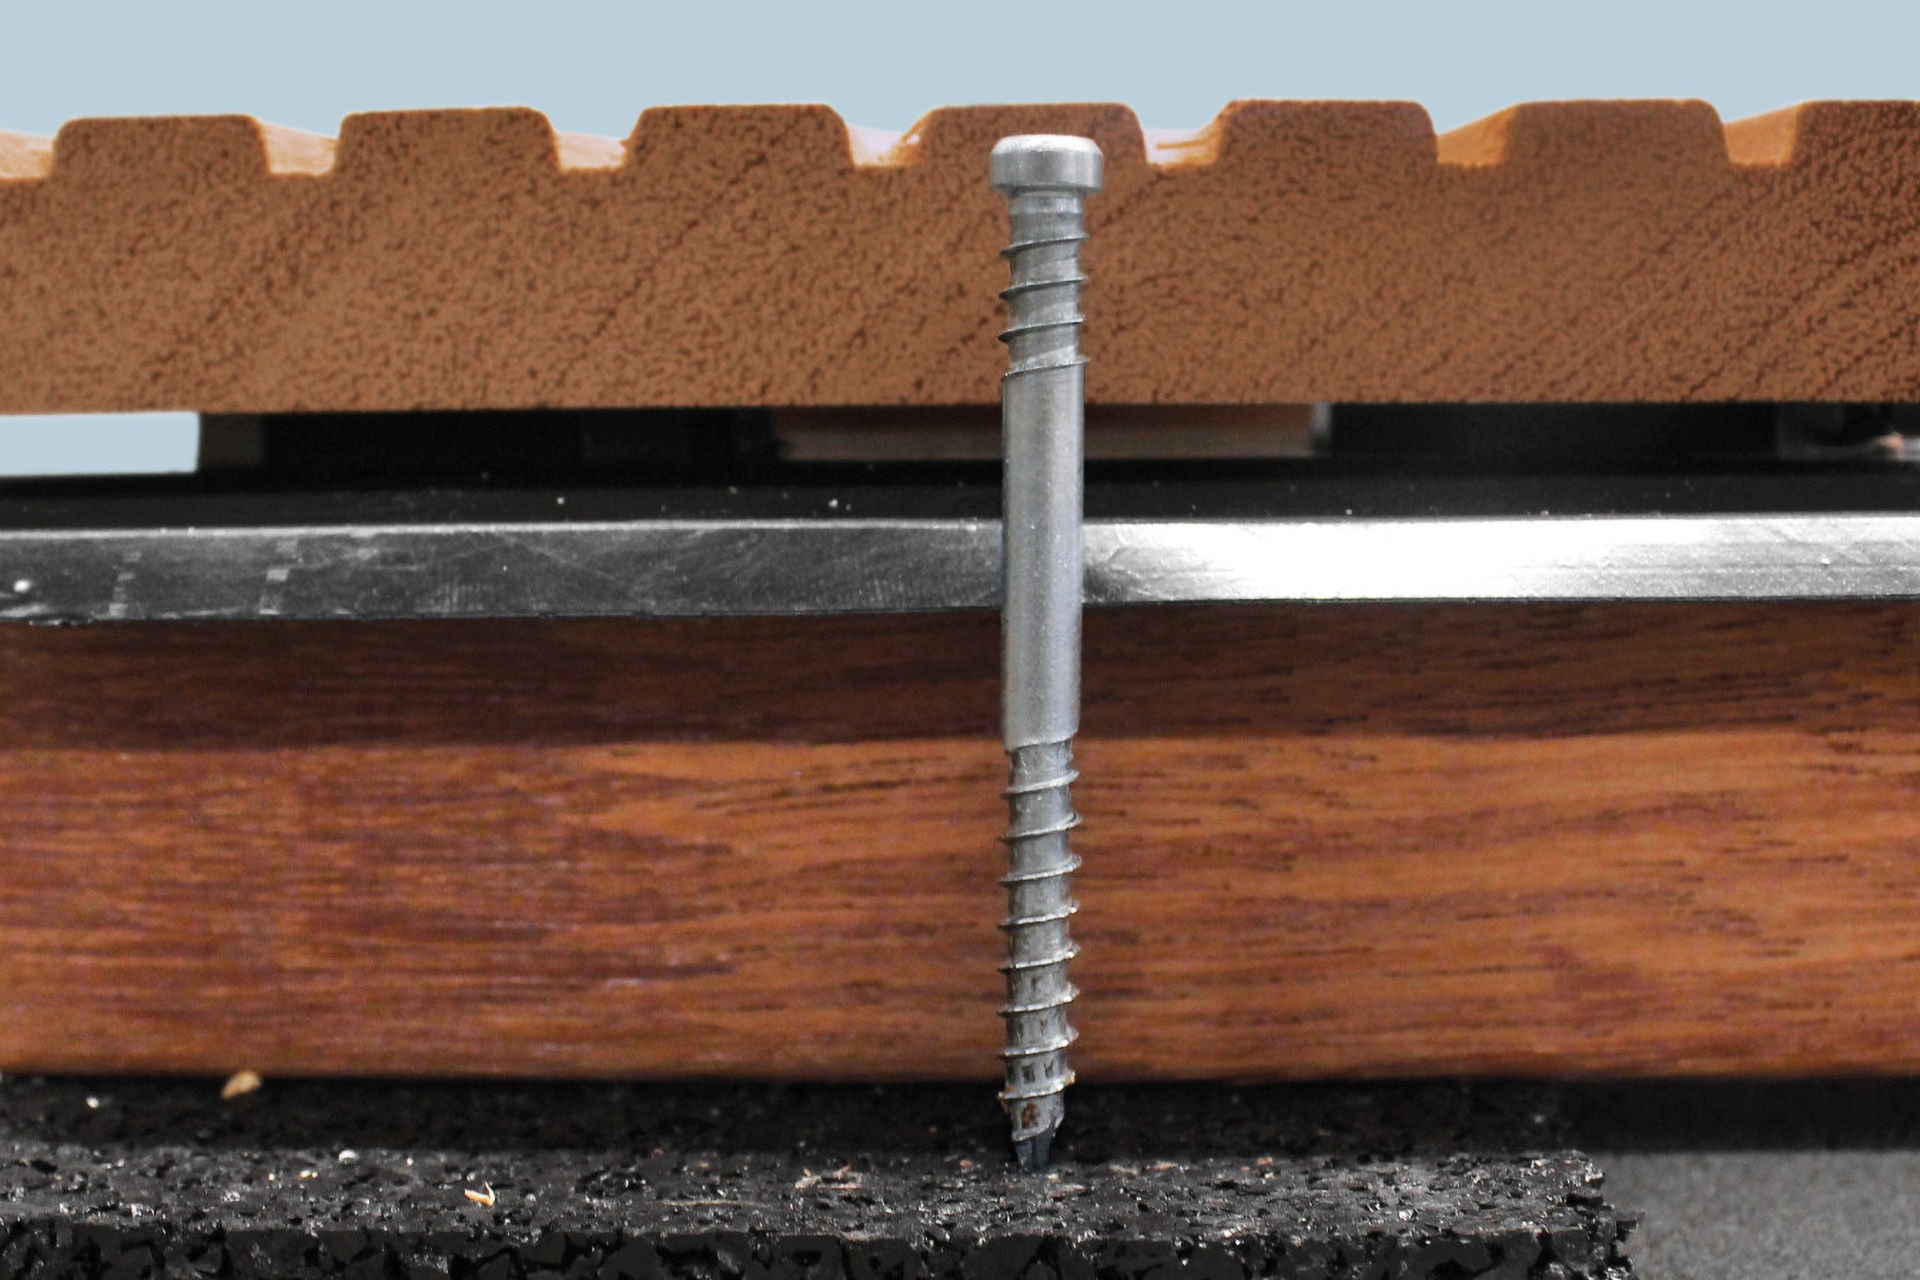
A normal thickness decking in an averagely used decking area requires a 5 mm thick screw diameter. In combination with a screw-in depth of at least 6 times, i.e. 30 mm, on the side of the substructure. For thicker planks and heavier stress, e.g. due to heavy traffic, this value increases to 6 mm diameter and 36 mm screw-in depth.
Frequently used screw lengths with visible screw connection
The following decking screw lengths have proven themselves in decking practice:
Plank thickness up to 21 mm | = | 60 mm screw length |
Plank thickness 22 – 28 mm | = | 70 mm screw length |
Plank thickness 28 or additional. Spacer | = | 80 mm screw length |
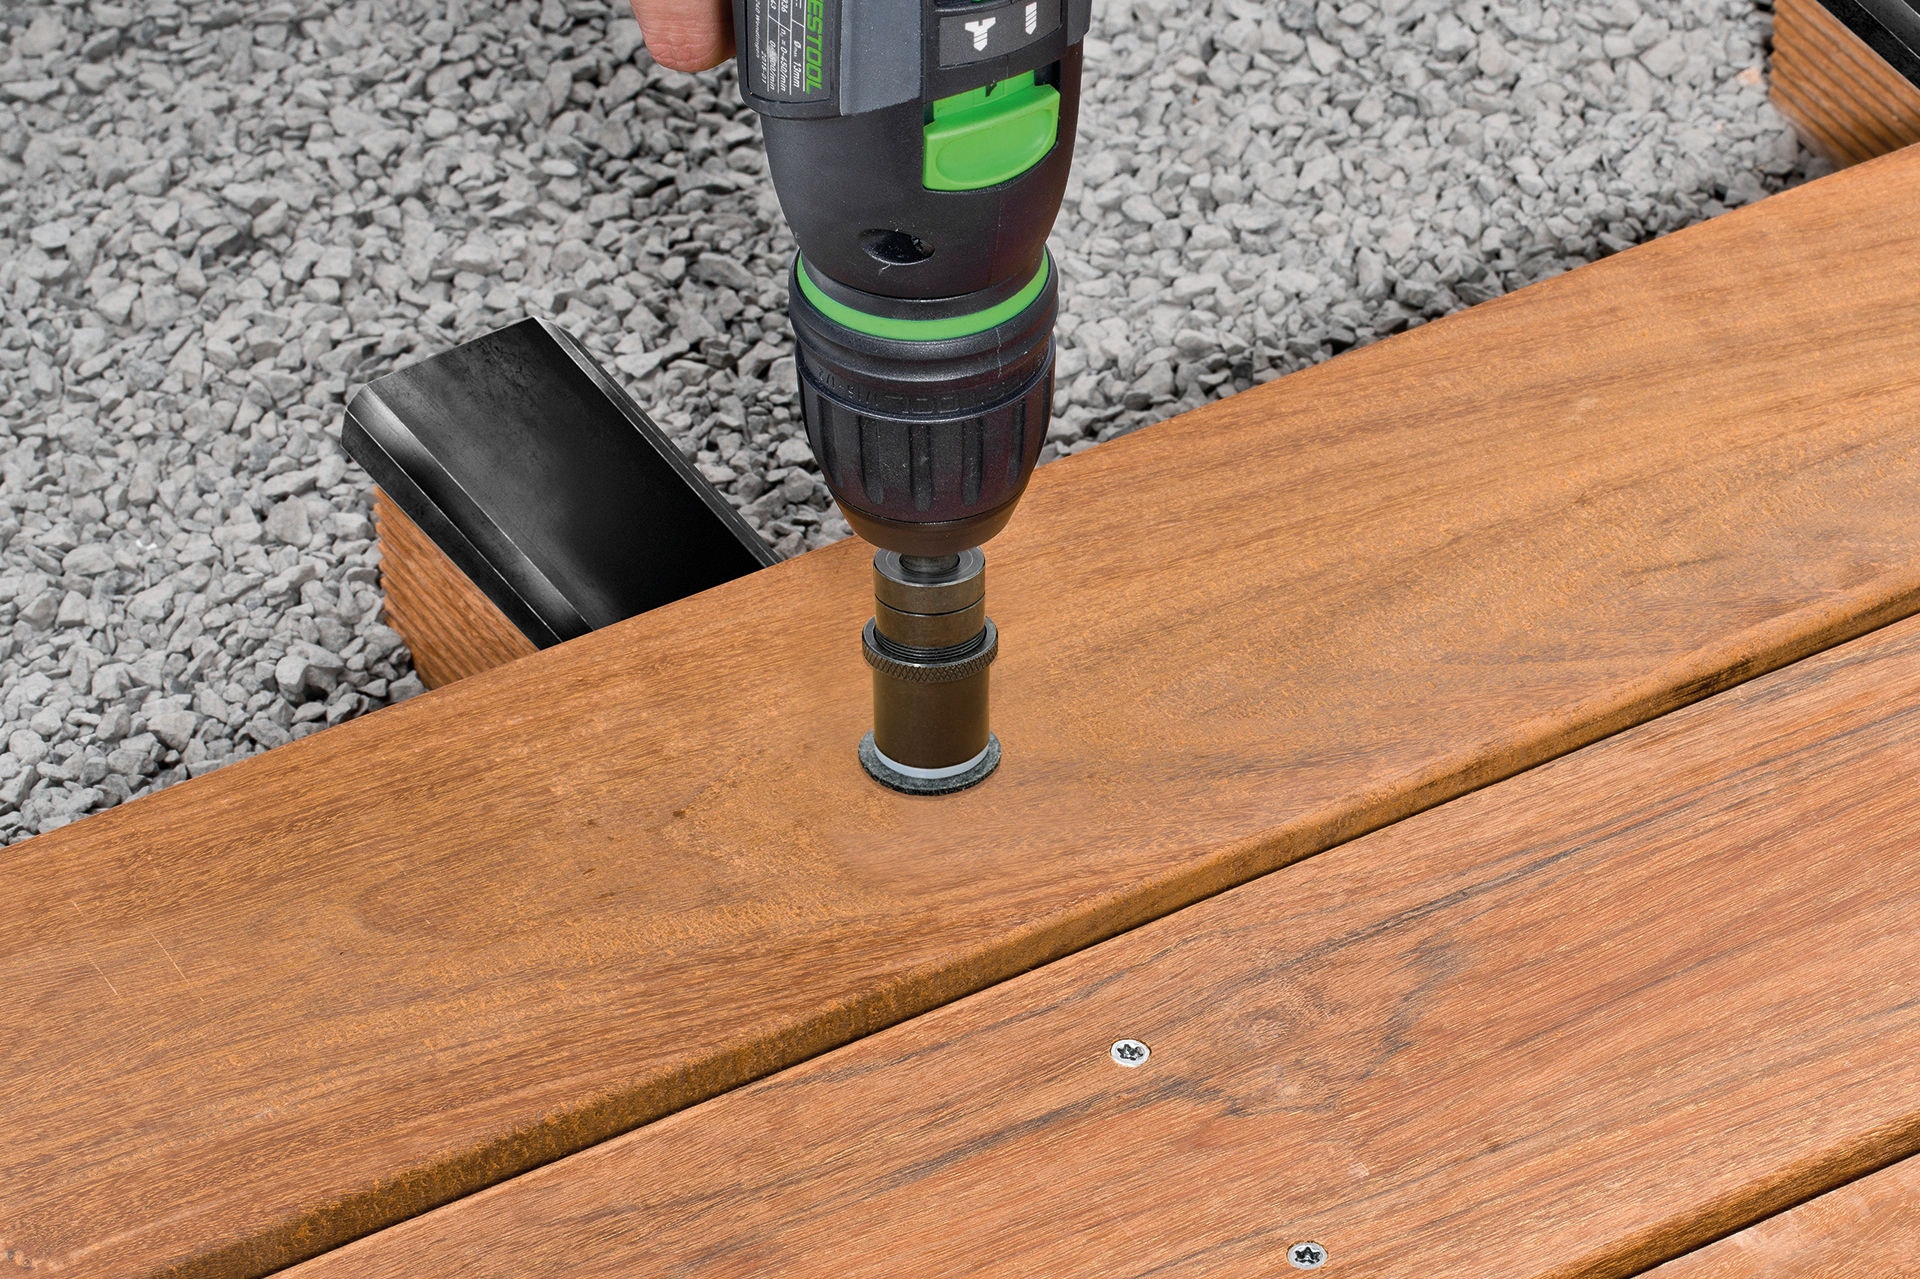
Pre-drilled screws better
Especially with hard and heavy hardwoods should always be pre-drilled. If the pre-drilling is missed, gaps and tears can occur. The pre-drilling rule also applies to thermal woods whose material behaviour is similar to hard woods.
The ideal height-adjustable pre-drill: SPAX step drill 4
Pre-drilling is also recommended for the substructure up to a depth corresponding to the complete screw length. The SPAX step drill 4 is practical. The special drill is available in different lengths. SPAX step drill 4 ensures that the desired drilling depth is achieved without the material splitting or tearing. The risk of splicing is naturally particularly high at the ends of the rescue.
Even if the mishap has not yet occurred at the time of assembly, the plank can still crack later on, e.g. in sunlight due to drying! Then it's better to pre-drill. Pre-drilling takes a bit of time, but helps to protect the material and reliably avoid unpleasant surprises.

Never screw too close to the end of the floorboard!
To ensure optimum stability, the distance from the last attachment point to the end of the plank should be at least 50 and not more than 150 mm. Large protrusions, but also the material behaviour of rotating woods such as Cumaru, can be brought under control with a retaining strip screwed under the bretten. This bar prevents the protruding ends from literally coming apart at the seams, twisting and creating stumbling blocks.
Double is better
Decking boards of more than 80 mm width must be fixed to the substructure with 2 screws placed next to each other.
The distance to the side edge of the plank should be at least 20 and a maximum of 30 mm. For a plank of 145 mm width, the distance between the two screws is an optimal 100 mm. This distance minimizes the risk of bowling of the decking. The bowling effect, a lateral bulge of the plank edges, is not only visually undesirable, it is also easy to trip over the towering plank edges.
Who has the choice ...
A wide variety of screws are offered for the installation of decking boards. Under the heading of screw science, the material width of stainless steel has already been discussed. But not only the stainless steel quality, also the technical design of a patio screw has an influence on the result quality of the wooden decking.
Silent pedal
Who wants the wooden decking to comment on every step with creaks or rattles? Our SPAX solution to this problem is the combination of a front screw part and a fixing thread located under the head. The front screw part pulls the plank onto the substructure. The fixing thread relieves the head on the one hand and holds the plank in position on the other.
Where, despite the summer heat and dwindling wood volume, everything remains well fixed in place, nothing can move noisily. Clattering and creaking noises are significantly reduced, SPAX switches off the sound.
Off into oblivion
For optical reasons, we recommend the SPAX patio screw with a small head for visible screwing. The screw connection is at least flush, better still with a 1 to 1.5 mm deep sink.
For surface-treated planks, the sinking should not exceed 1 mm. Otherwise, the maximum value is 2 mm. To achieve these exact sinking values, please use the SPAX Drive Stop for cordless screwdrivers. Not suitable for impact wrenches!
Exactly instead of somehow: SPAX Drive Stop
A noble wooden decking is not a Euro pallet: With the SPAX Drive Stop, the depth of the sinking can be precisely adjusted, and the result meets high aesthetic demands in terms of uniformity and precision.
Special and special cases
Special process solutions
No rule without exception, no situation that could not perhaps be answered with a special measure. Thanks to research and development as well as intensive exchange with wood craftsmen and industry, SPAX has the right screw and the right process for most special cases.
Special case aluminium substructure
Aluminium is usually used when a wooden substructure cannot be implemented due to the low possible construction height or excessive weight of the decking. The reasons for this are mostly architectural.
The SPAX Alu screw made of stainless steel A2 is ideal for the requirements in an aluminium substructure. It has a stable sheet metal double-pass thread and a special drill tip for up to 4 mm material thickness. In this application, only the wooden plank is pre-drilled with the SPAX drill 5.2. The pre-drilling of the aluminium is no longer necessary, despite the resulting strong holding force. However, the holding force reaches a physical limit in the case of strongly rotating decking boards. Therefore, the SPAX Alu should not be used, for example, for the screwing of Cumaru decking boards.
Making the groove a virtue
In addition to the decking boards laid with visible joints, the trade also offers planks with grooves. These offer a different look after completion, and they can also be laid differently. You can choose between the screw connection on the surface or alternatively the screw connection in the groove. Both have specific advantages and disadvantages.
Screwing on the surface
Screwing on the surface is more demanding because it requires a great deal of precision. Small mistakes are immediately punished in the form of an unsatisfactory appearance. After all, it is important to screw all screws exactly with uniform depth and in a no less exact line of alignment. However, this form of accentuation has its special charm when it is combined with the required accuracy.
Screwing in the groove
When screwing in the groove, the screw heads appear less, slightly protruding screw heads are less important. Visually as well as mechanically. In the case of boat docks, bridges and similar structures, screwing in the groove is therefore state of the art. In the case of these buildings, it is also important to think ahead about future care and maintenance work. In order to exclude complaints, the corrosion class of the stainless steel screws used must not collide with the substances used in maintenance and care. For such construction projects, SPAX has developed the special SPAX path and bridge screw. The screw is intended for planks from 40 mm board thickness and should always be pre-drilled with the specially developed SPAX step drill 6. The SPAX path and bridge also copes well with ribbed and smooth decking. For corrugated and smooth surfaces, special precision must be worked and attention must be paid to tear-free drilling and screwing.
On the run
For demanding projects in footbridge and path construction, alignable screwing is an absolute must. One speaks of flight if the maximum deviation from the resulting straight line of all points is not more than plus/ minus 5 mm over a length of 2 m. This strict escape rule is based on optical and static requirements.
The screws used in projects demanding under building law, such as boat docks, must be suitable and approved for both softwood and hardwood in accordance with DIN EN 1995-1.
Invisible attachment of decking boards
The concealed screw connection and the use of special fastening systems result in a very special visual appearance. The fastening decision should be made depending on the type of wood and planks.
Solutions
Is the concealed attachment a system solution? If so, only modules of this system and no non-system articles should be installed. In the case of system solutions, the manufacturer's installation instructions must also be followed before other construction tips.
The conformity rule also includes the release of wood species and other modifications. Reason: Systems can only work in the system. Anyone who does not comply with the system specifications loses all warranty claims.
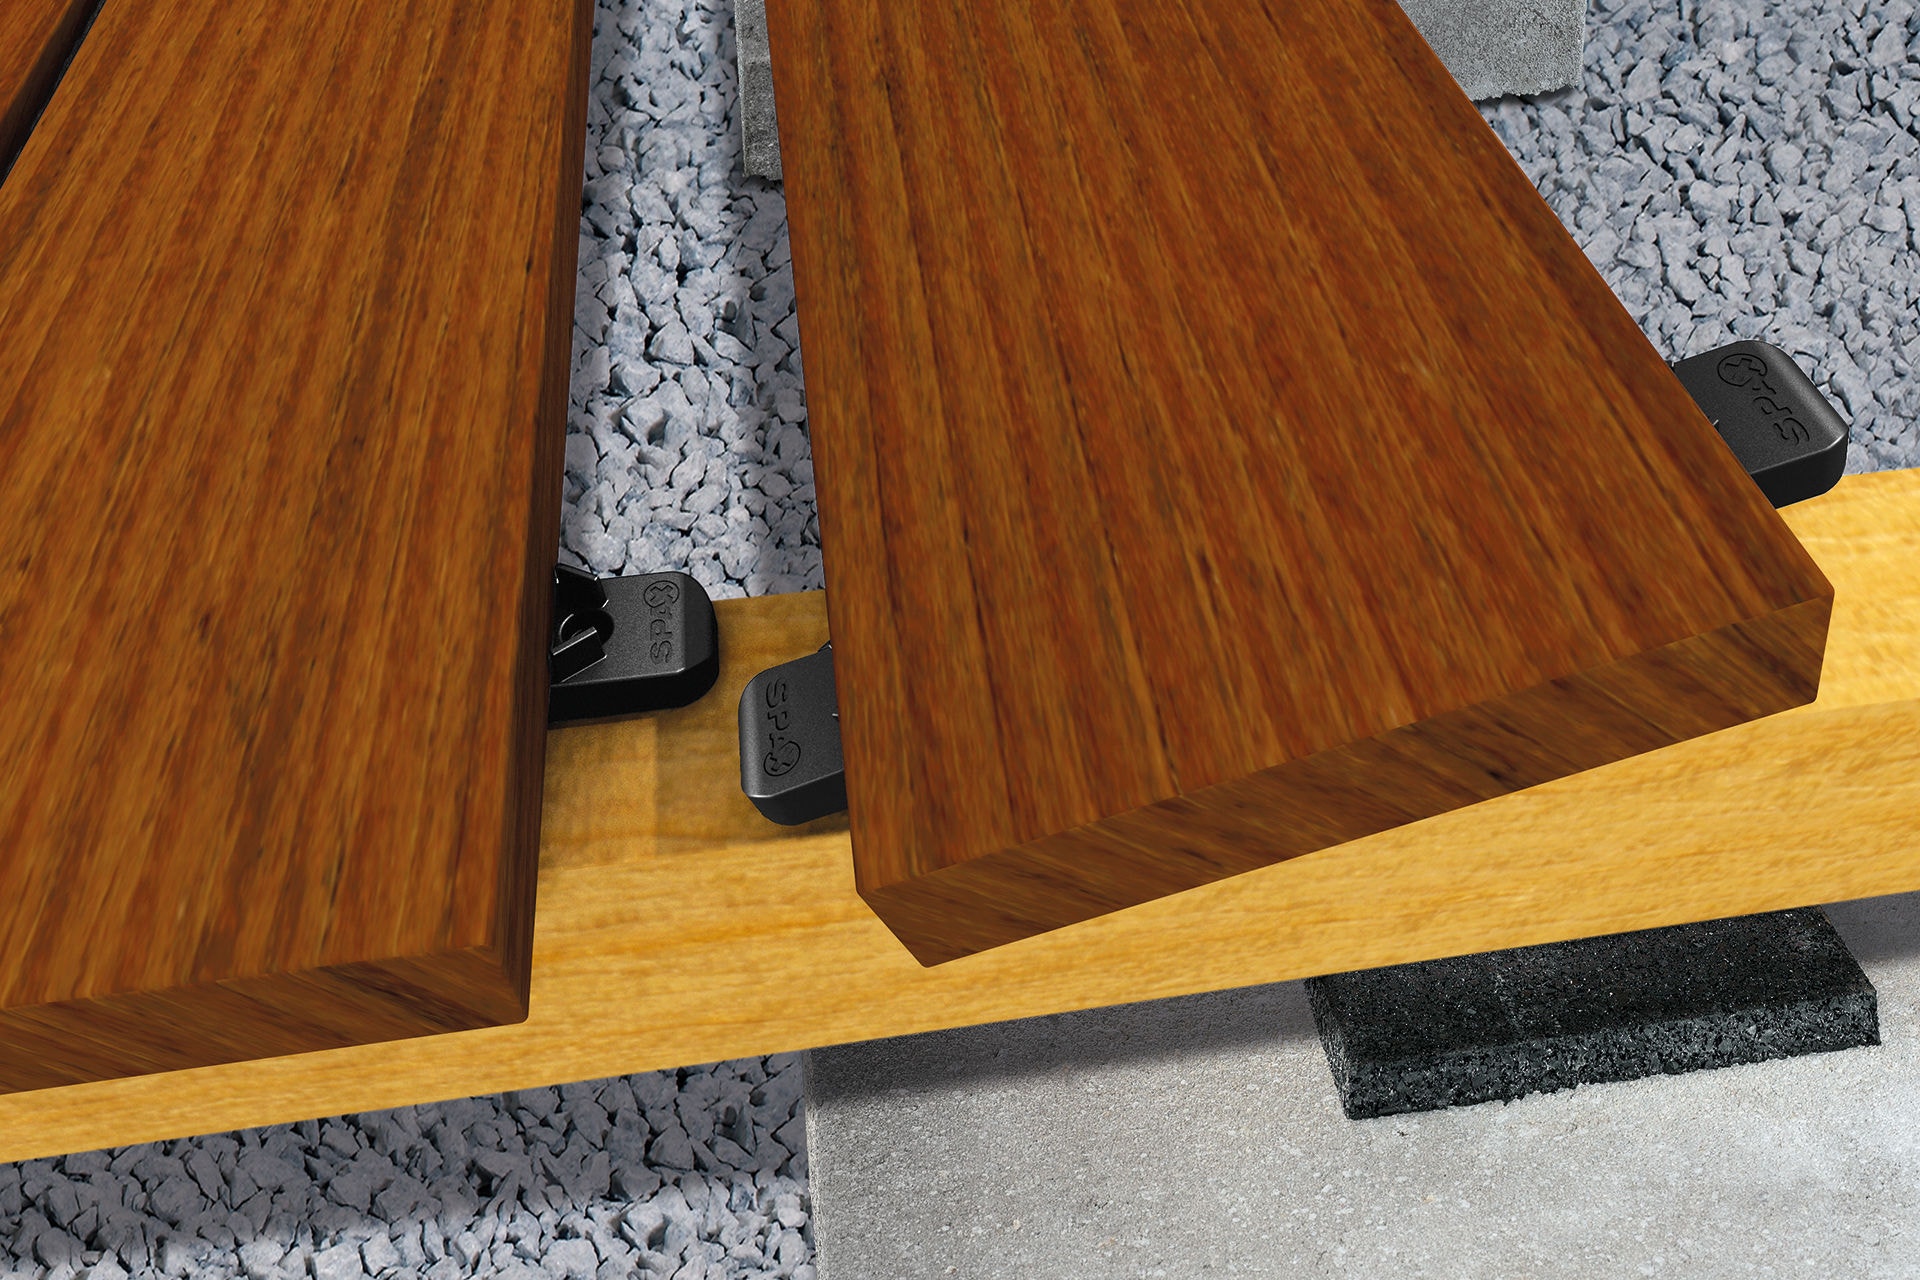
Two birds with one stone
SPAX Stick pro is the concealed – and thus virtually invisible – fastener in SPAX quality. SPAX Stick pro is made of high-tech plastic and, depending on the screws used for fastening, can be used either on wooden or aluminium substructures.
The unbeatable advantage: SPAX Stick pro combines concealed fastening with structural wood protection. The protection consists in the fact that an extra distance is inserted between decking boards and substructure. Thanks to the faster drainage of water and improved aeration, drying is accelerated. The useful life and thus the economic efficiency of the wooden terrace are significantly increased.
Because these plastic fasteners have not yet been standardized, it must be checked on a case-by-case basis whether a building supervisory or comparable proof of usability must be provided.